

Introduction to Boston Cream Pie Cupcakes
There’s something magical about a cupcake that brings back memories of childhood celebrations. Boston Cream Pie Cupcakes are a delightful twist on the classic dessert, combining the rich flavors of vanilla pudding and chocolate in a portable treat. Whether you’re looking to impress your friends at a gathering or simply want a sweet escape after a long day, these cupcakes are the perfect solution. They’re easy to whip up and even easier to enjoy. Trust me, once you take a bite, you’ll be transported back to those carefree days of indulgence.
Why You’ll Love This Boston Cream Pie Cupcakes
These Boston Cream Pie Cupcakes are a game-changer for any dessert lover. They’re quick to make, taking just about 40 minutes from start to finish. The combination of fluffy vanilla cake, creamy pudding, and rich chocolate topping creates a flavor explosion that’s hard to resist. Plus, they’re perfect for any occasion, whether it’s a casual weeknight treat or a fancy dinner party. You’ll find yourself making these again and again!
Ingredients for Boston Cream Pie Cupcakes
Gathering the right ingredients is the first step to creating these delightful Boston Cream Pie Cupcakes. Here’s what you’ll need:
- All-purpose flour: The backbone of your cupcakes, providing structure and a light texture.
- Baking powder: This leavening agent helps the cupcakes rise, giving them that fluffy bite.
- Salt: Just a pinch enhances the sweetness and balances the flavors.
- Unsalted butter: Softened butter adds richness and moisture to the batter.
- Granulated sugar: Sweetens the cupcakes and contributes to their tender crumb.
- Large eggs: They bind the ingredients together and add moisture.
- Vanilla extract: A splash of this aromatic essence elevates the flavor profile.
- Milk: Adds moisture and helps create a smooth batter.
- Vanilla pudding: The star filling! Use store-bought or homemade for a creamy surprise.
- Heavy cream: Essential for whipping up a luscious topping.
- Powdered sugar: Sweetens the whipped cream and helps it hold its shape.
- Semi-sweet chocolate chips: For that decadent drizzle on top, adding a rich chocolate flavor.
- Unsalted butter (for chocolate): Helps the chocolate melt smoothly for a perfect drizzle.
For those looking to lighten things up, consider using low-fat milk and sugar-free pudding. You can also swap the chocolate topping for a dusting of cocoa powder for a different flavor twist. Exact measurements for each ingredient can be found at the bottom of the article, ready for printing!
How to Make Boston Cream Pie Cupcakes
Creating these Boston Cream Pie Cupcakes is a delightful journey that’s as enjoyable as the final product. Follow these simple steps, and you’ll have a batch of scrumptious cupcakes ready to impress!
Step 1: Preheat and Prepare
Start by preheating your oven to 350°F. This ensures your cupcakes bake evenly. While the oven warms up, line a cupcake pan with paper liners. This not only makes for easy removal but also adds a pop of color to your treats!
Step 2: Mix Dry Ingredients
In a medium bowl, whisk together the all-purpose flour, baking powder, and salt. This step is crucial as it evenly distributes the leavening agent, ensuring your cupcakes rise beautifully. Set this mixture aside for now.
Step 3: Cream Butter and Sugar
In a large bowl, beat the softened unsalted butter and granulated sugar together until the mixture is light and fluffy, about 3-4 minutes. This is where the magic begins! Next, add the eggs one at a time, mixing well after each addition. Stir in the vanilla extract for that irresistible aroma.
Step 4: Combine Wet and Dry Ingredients
Gradually add the dry ingredients to the wet mixture, alternating with the milk. Start and end with the flour mixture. This technique helps maintain a smooth batter. Mix until just combined; overmixing can lead to dense cupcakes, and nobody wants that!
Step 5: Bake the Cupcakes
Now, it’s time to fill those liners! Divide the batter evenly among them, filling each about two-thirds full. Bake in your preheated oven for 18-20 minutes. To check for doneness, insert a toothpick into the center; it should come out clean. Once baked, let them cool in the pan for 5 minutes before transferring to a wire rack.
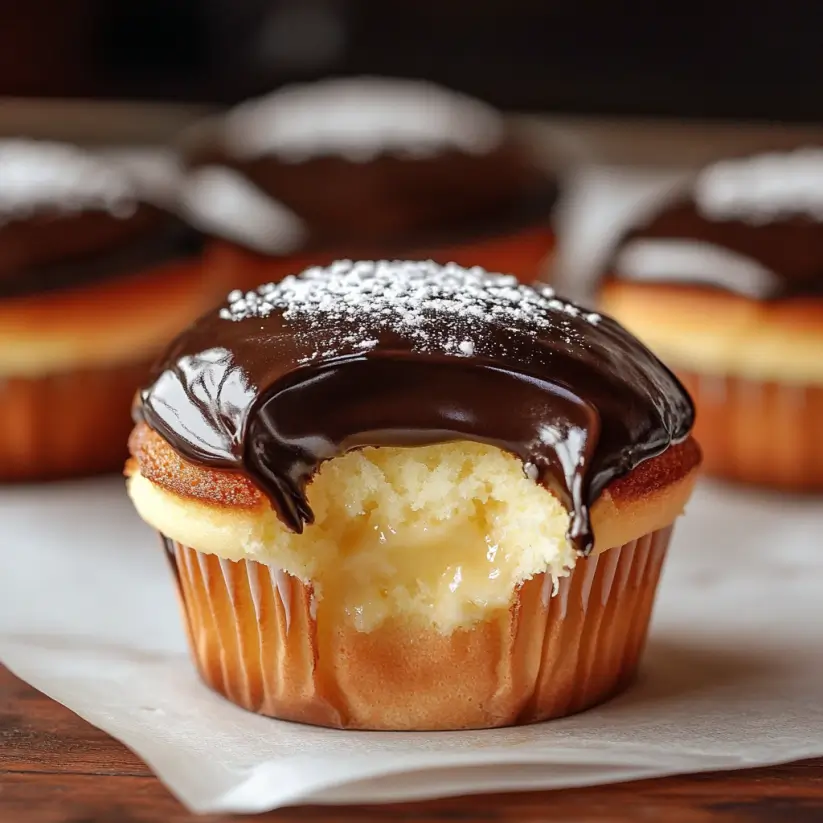
Step 6: Fill with Vanilla Pudding
Once the cupcakes are completely cool, it’s time for the fun part! Use a small knife or a cupcake corer to remove a small portion from the center of each cupcake. Fill each cavity with about 1 tablespoon of vanilla pudding. This creamy filling is what makes these cupcakes truly special!
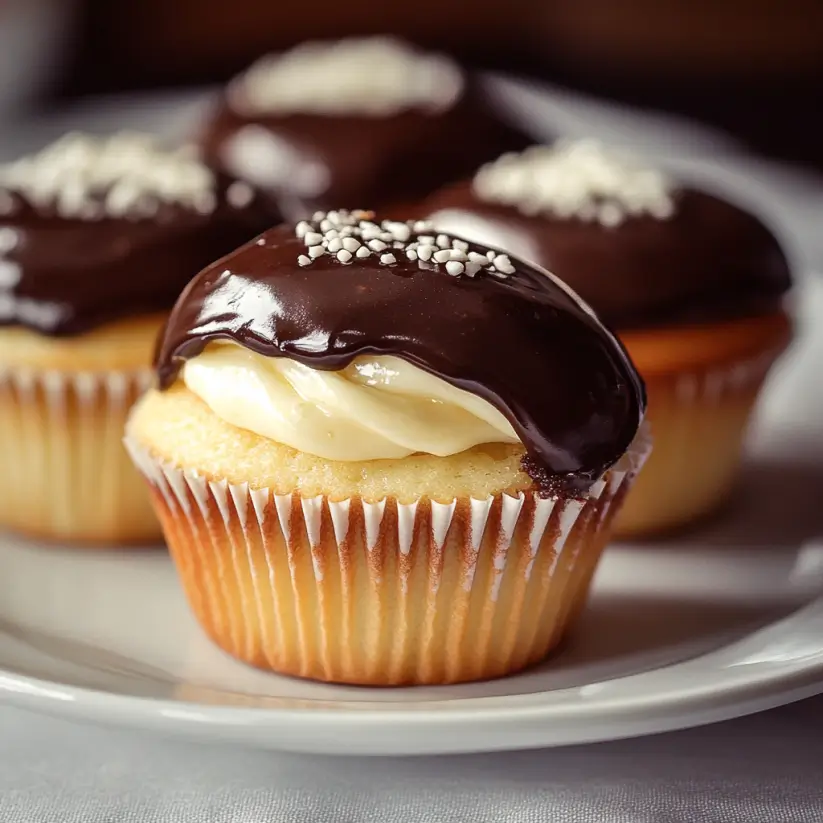
Step 7: Whip Cream Topping
In a medium bowl, whip the heavy cream with powdered sugar until soft peaks form. This fluffy topping is the perfect complement to your cupcakes. Top each filled cupcake with a generous dollop of whipped cream, making them look as good as they taste!
Step 8: Drizzle Chocolate
Finally, let’s add that decadent touch! In a microwave-safe bowl, combine the semi-sweet chocolate chips and unsalted butter. Microwave in 30-second intervals, stirring in between, until melted and smooth. Drizzle this luscious chocolate over the whipped cream on each cupcake. It’s the cherry on top of your delicious creation!
Tips for Success
- Make sure your butter is softened for easy creaming with sugar.
- Don’t overmix the batter; mix until just combined for fluffy cupcakes.
- Use a toothpick to check for doneness; it should come out clean.
- Let cupcakes cool completely before filling to prevent the pudding from melting.
- For a fun twist, try adding a splash of almond extract to the batter!
Equipment Needed
- Cupcake pan: A standard 12-cup pan works perfectly; you can use silicone molds for easy removal.
- Mixing bowls: A set of various sizes will help with ingredient prep.
- Whisk: Essential for mixing dry ingredients and whipping cream.
- Measuring cups and spoons: Accurate measurements are key to success.
- Microwave-safe bowl: For melting chocolate smoothly.
Variations
- Chocolate Cupcakes: Swap out the vanilla cake for chocolate cake for a double chocolate delight.
- Fruit-Filled: Add a layer of fresh berries or fruit preserves beneath the whipped cream for a fruity twist.
- Gluten-Free: Use a gluten-free all-purpose flour blend to make these cupcakes suitable for gluten-sensitive friends.
- Nutty Flavor: Incorporate finely chopped nuts, like almonds or hazelnuts, into the batter for added texture and flavor.
- Vegan Option: Substitute eggs with flaxseed meal and use plant-based butter and milk for a vegan-friendly version.
Serving Suggestions
- Pair these cupcakes with a scoop of vanilla ice cream for an indulgent dessert.
- Serve alongside a fresh fruit salad to balance the sweetness.
- For drinks, consider a rich coffee or a glass of cold milk.
- Present on a decorative platter for a stunning display at gatherings.
FAQs about Boston Cream Pie Cupcakes
Curious about these delightful Boston Cream Pie Cupcakes? Here are some frequently asked questions that might help you on your baking journey!
Can I make the cupcakes ahead of time?
Absolutely! You can bake the cupcakes a day in advance. Just store them in an airtight container at room temperature. Fill them with pudding and add the whipped cream topping on the day you plan to serve them for the best texture.
What can I use instead of vanilla pudding?
If you’re looking for alternatives, consider using chocolate pudding for a richer flavor. You could also try a pastry cream for a more decadent filling. Just ensure it’s thick enough to hold up inside the cupcakes!
How do I store leftover cupcakes?
Store any leftover Boston Cream Pie Cupcakes in the refrigerator due to the pudding and whipped cream. They’ll stay fresh for about 2-3 days. Just be sure to cover them to prevent them from drying out.
Can I freeze these cupcakes?
Yes, you can freeze the cupcakes! Bake and cool them completely, then freeze them without the filling and toppings. When you’re ready to enjoy, thaw them and fill with pudding and whipped cream.
What’s the best way to serve these cupcakes?
For a stunning presentation, serve the cupcakes on a decorative platter. You can also garnish with chocolate shavings or fresh berries for an extra touch. Pair them with coffee or a glass of milk for a delightful treat!
Final Thoughts
Making Boston Cream Pie Cupcakes is more than just baking; it’s about creating sweet memories. Each bite is a delightful blend of flavors that transports you back to simpler times. The joy of filling each cupcake with creamy pudding and topping it with whipped cream and chocolate is truly rewarding. Whether you’re sharing them with family or enjoying them solo, these cupcakes bring a smile to your face. So, roll up your sleeves, embrace the process, and indulge in the happiness these treats create. Trust me, they’re worth every delicious moment!
Boston Cream Pie Cupcakes: Indulge in this Easy Recipe!
Ingredients
Method
- Preheat the oven to 350°F. Line a cupcake pan with paper liners.
- In a medium bowl, whisk together the flour, baking powder, and salt. Set aside.
- In a large bowl, beat the softened butter and granulated sugar together until light and fluffy, about 3-4 minutes. Add the eggs one at a time, mixing well after each addition. Stir in the vanilla extract.
- Gradually add the dry ingredients to the wet mixture, alternating with the milk. Begin and end with the flour mixture. Mix until just combined.
- Divide the batter evenly among the cupcake liners, filling each about two-thirds full. Bake for 18-20 minutes, or until a toothpick inserted into the center comes out clean. Allow to cool in the pan for 5 minutes before transferring to a wire rack to cool completely.
- Once the cupcakes are cool, use a small knife or cupcake corer to remove a small portion from the center of each cupcake. Fill each cavity with about 1 tablespoon of vanilla pudding.
- In a medium bowl, whip the heavy cream with the powdered sugar until soft peaks form. Top each filled cupcake with a dollop of whipped cream.
- In a microwave-safe bowl, combine the chocolate chips and butter. Microwave in 30-second intervals, stirring in between, until melted and smooth. Drizzle the chocolate over the whipped cream on each cupcake.
Nutrition
Notes
- For a lighter version, use low-fat milk and sugar-free pudding.
- You can substitute the chocolate topping with a dusting of cocoa powder for a different flavor profile.