

As Halloween approaches, the air is filled with a mix of excitement and delightful anticipation. This year, I decided to embrace the whimsical spirit of the season by whipping up these Spooky Cute Ghost Mini Cake Pans. Perfectly paired with a chocolatey base and topped with fluffy buttercream, they are not just easy to make but also a guaranteed hit at any gathering! Whether you’re hosting a Halloween party or simply want to treat your family to something fun, this recipe makes it simple for even the most novice baker to create these charming ghost cakes. The bonus? They’re freezer-friendly, making it easy to prep ahead and save time! Are you ready to conjure up some festive magic in your kitchen?
Why Are Ghost Mini Cakes So Fun?
Whimsical Halloween Treat: These charming ghost mini cakes bring a playful spirit to your festivities, perfect for all ages!
Effortless Baking: Even novice bakers can whip these up with ease, making it a stress-free experience for any occasion.
Versatile Decorating: Use your creativity to customize them with different colors and sprinkles for a unique touch.
Make-ahead Friendly: Freeze undecorated cakes in advance, ensuring you’re ready for last-minute gatherings.
Crowd-pleasing Delight: Their cute appearance and delicious taste are sure to impress friends and family alike! Don’t forget to check out other festive options like Mini Patriotic Cheesecakes for year-round inspiration!
Ghost Mini Cake Pans Ingredients
For the Cake
- Chocolate Box Cake Mix – Provides the rich base flavor and structure; feel free to substitute with a vanilla box mix for a delightful twist!
- Buttermilk – Adds moisture and richness to the cake; can be replaced with plain milk mixed with a splash of vinegar if needed.
- Vegetable Oil – Keeps the cake wonderfully moist; olive oil or coconut oil can be used as substitutes based on your preference.
- Eggs – Binds the ingredients together and adds structure; for a vegan option, replace with 1/4 cup of unsweetened applesauce per egg.
- Vanilla Extract – Enhances the cake’s flavor profile; using pure vanilla will give it a richer taste.
For the Buttercream
- Butter (Room Temperature) – This gives creaminess to the buttercream frosting; margarine can be used for a dairy-free option, but ensure it’s soft.
- Pasteurized Egg Whites – Create a stable meringue for the frosting; substitute with aquafaba for a vegan alternative if desired.
- Powdered Sugar – Sweetens and thickens the buttercream; can replace with erythritol for a sugar alternative.
- Salt – Balances the sweetness and enhances the flavor, so use a fine sea salt to avoid graininess.
- Additional Vanilla Extract – Further intensifies the flavor of your buttercream for a delightful taste!
Craft these Ghost Mini Cake Pans and let the festive spirit of Halloween shine through with every delightful bite!
Step‑by‑Step Instructions for Spooky Cute Ghost Mini Cake Pans
Step 1: Preheat the Oven
Begin by preheating your oven to 325°F (163°C). This step is crucial for ensuring your ghost mini cakes bake evenly and rise beautifully. While the oven warms up, prepare your mini cake pans by greasing them lightly with butter or a non-stick spray, readying them for the delicious chocolate batter that is about to come.
Step 2: Mix the Cake Batter
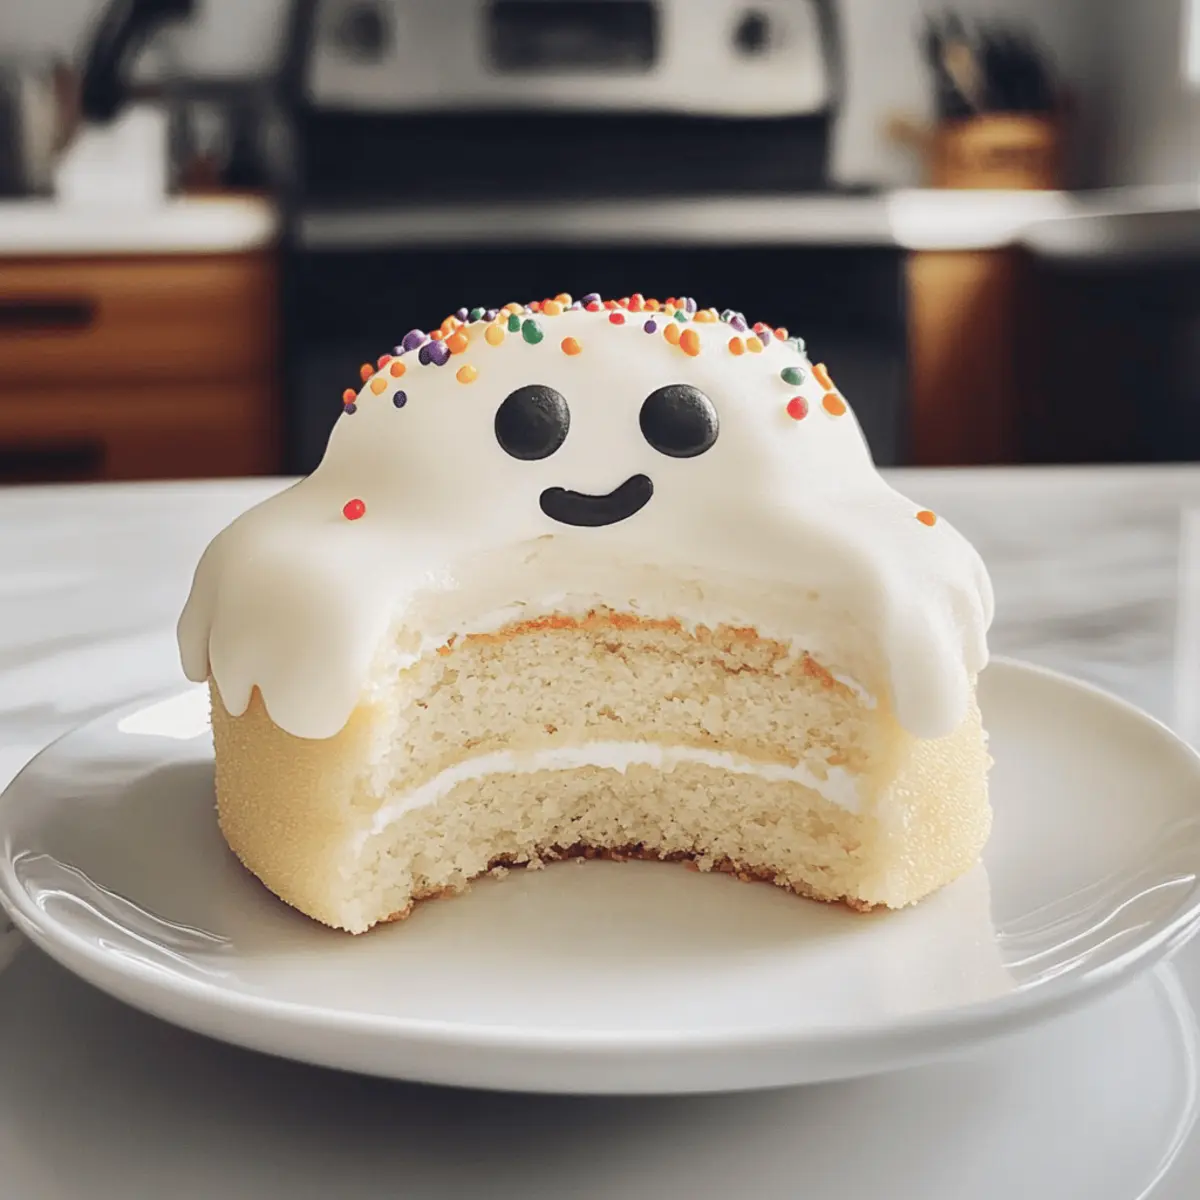
In a large mixing bowl, combine the chocolate box cake mix, buttermilk, vegetable oil, eggs, and vanilla extract. Use a hand whisk to mix the ingredients for about 2 minutes, ensuring they are well combined and smooth. The batter should be thick and glossy, filled with the rich aroma of chocolate. This delicious blend will form the base of your spooky cute ghost mini cakes!
Step 3: Pour the Batter into the Pans
Carefully pour the cake batter into your prepared mini cake pans, filling each one just under halfway. This allows room for the cakes to rise without spilling over. Use a spatula to ensure the batter distributes evenly, giving your ghost mini cakes a consistent shape. Once filled, they are ready to be baked to perfection.
Step 4: Bake the Mini Cakes
Place the filled cake pans in the preheated oven and bake for 25 to 30 minutes. Check for doneness by inserting a toothpick into the center of a cake; it should come out clean or with a few moist crumbs attached. Keep an eye on them as baking times may vary slightly depending on your oven. Once baked, let them offer their delightful scent while you prepare for the next step!
Step 5: Cool the Cakes
After removing the mini cakes from the oven, allow them to cool in the pans for about 15 minutes. This cooling period helps prevent the cakes from crumbling when you turn them out onto a wire rack. Carefully run a knife around the edges to loosen them before gently inverting the pans, revealing your perfectly baked ghost mini cakes.
Step 6: Prepare the Buttercream Frosting
For the buttercream frosting, start by combining pasteurized egg whites, powdered sugar, and salt in a mixing bowl. Beat the mixture at low speed until combined, then increase to high speed, mixing until the egg whites are glossy and hold stiff peaks. This meringue base is essential for achieving a light and fluffy frosting for your ghost mini cakes.
Step 7: Add the Butter
Gradually add the softened butter to the meringue mixture, mixing at medium speed for approximately 10 minutes. Make sure to scrape down the sides of the bowl occasionally to ensure everything is well incorporated. You’ll know it’s ready when your buttercream is creamy, fluffy, and has a smooth consistency, just right for decorating your ghostly cakes.
Step 8: Flavor the Buttercream
Once the butter is fully incorporated, add the additional teaspoon of vanilla extract and switch to a paddle attachment. Mix on low to medium speed for another 5 to 10 minutes, which will help remove any air bubbles and give your buttercream a silky finish. This delicious frosting will create the perfect ghostly appearance atop your mini cakes.
Step 9: Frost and Decorate
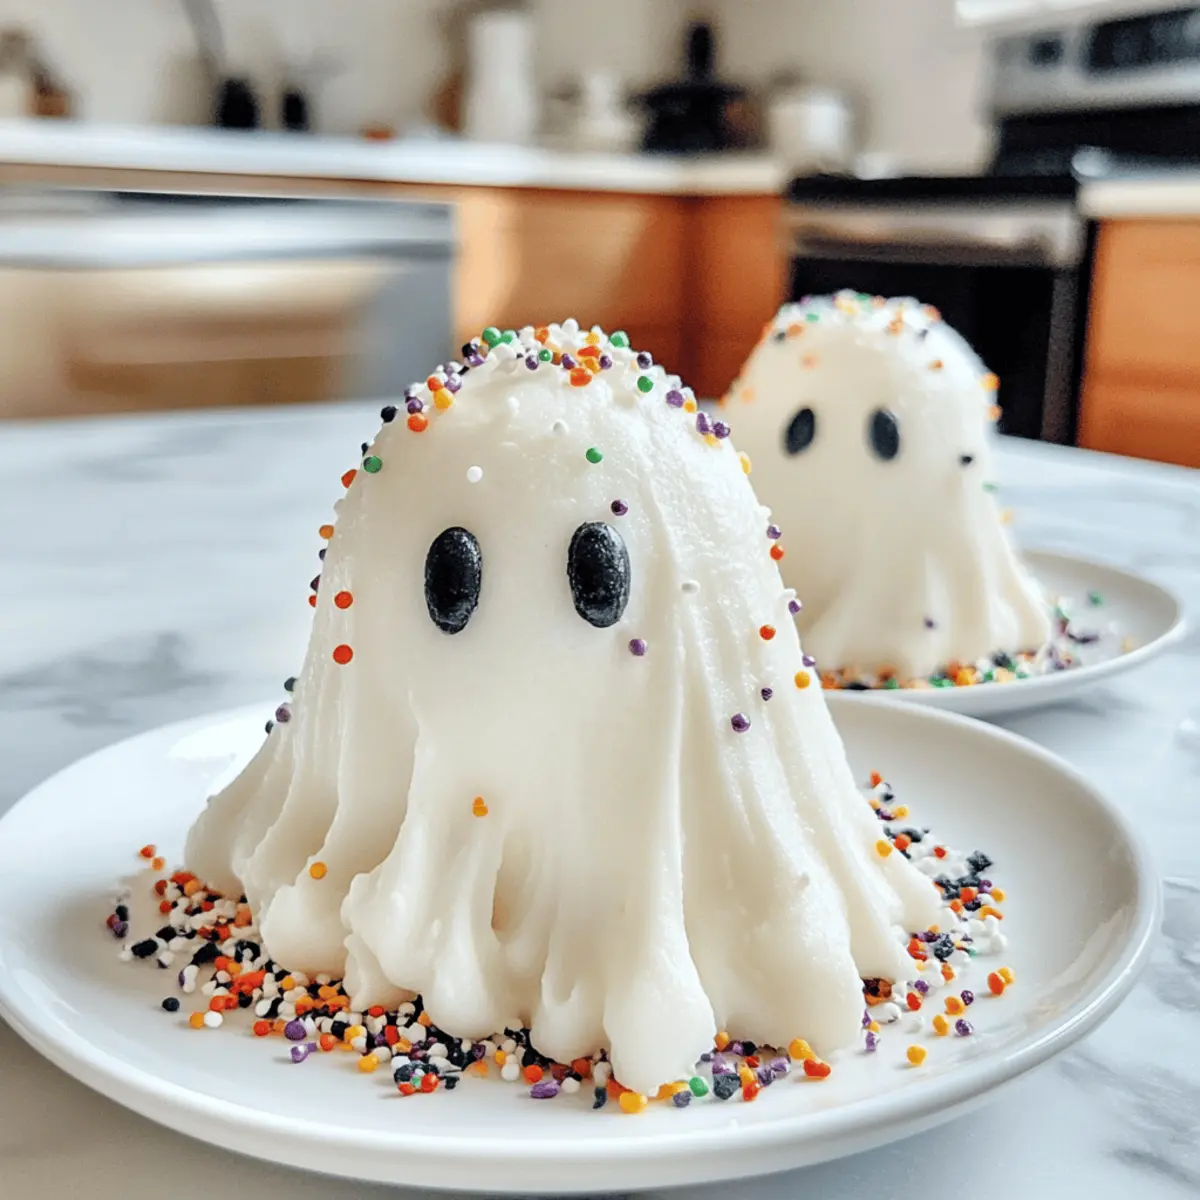
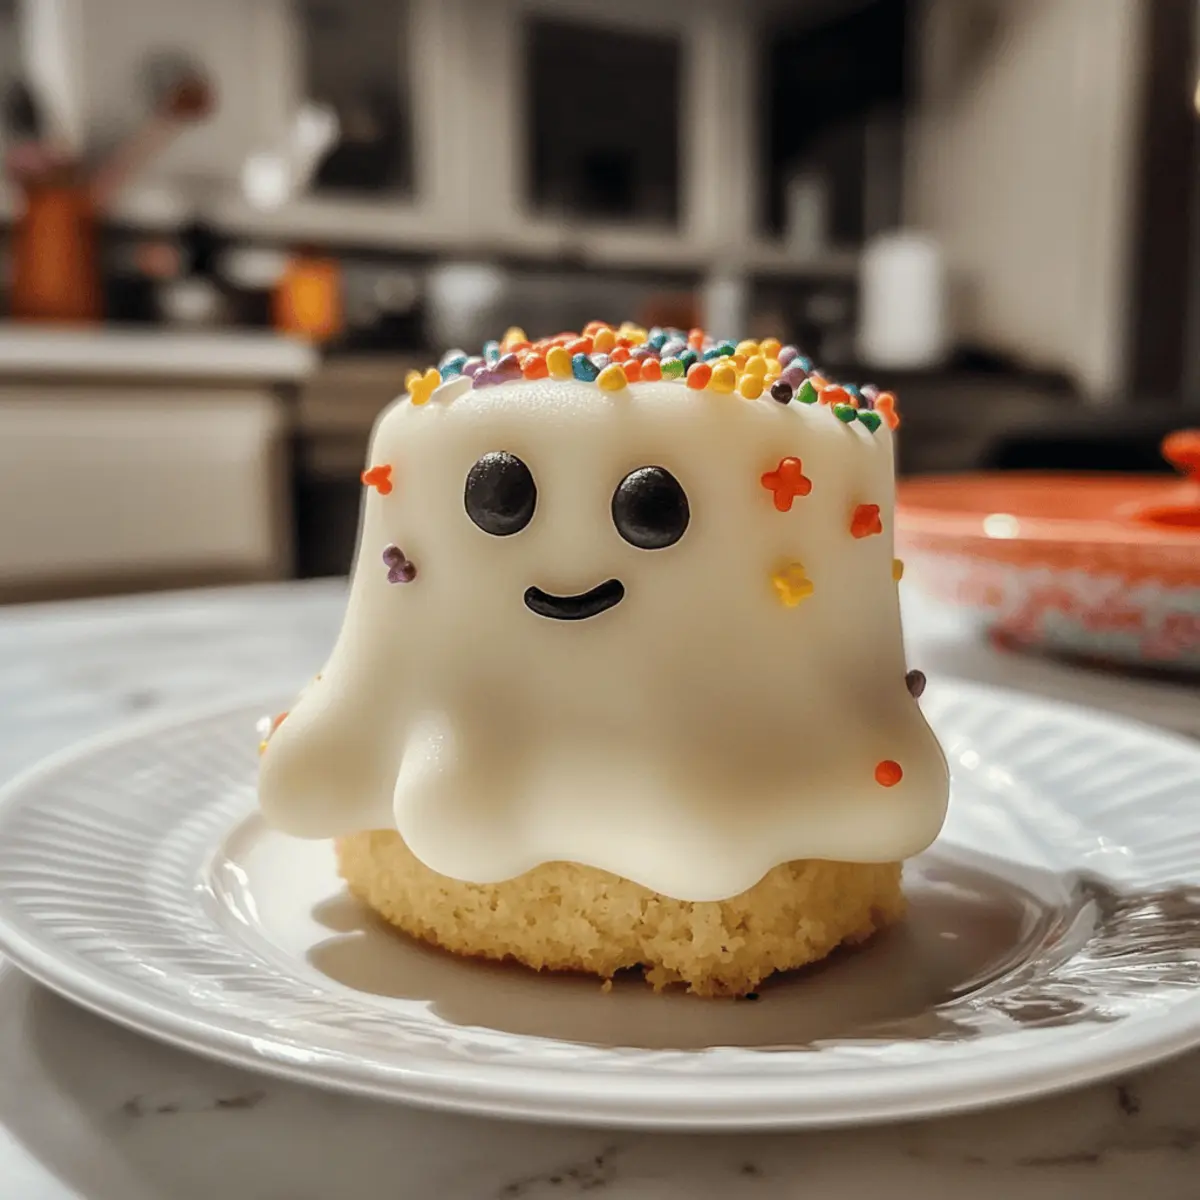
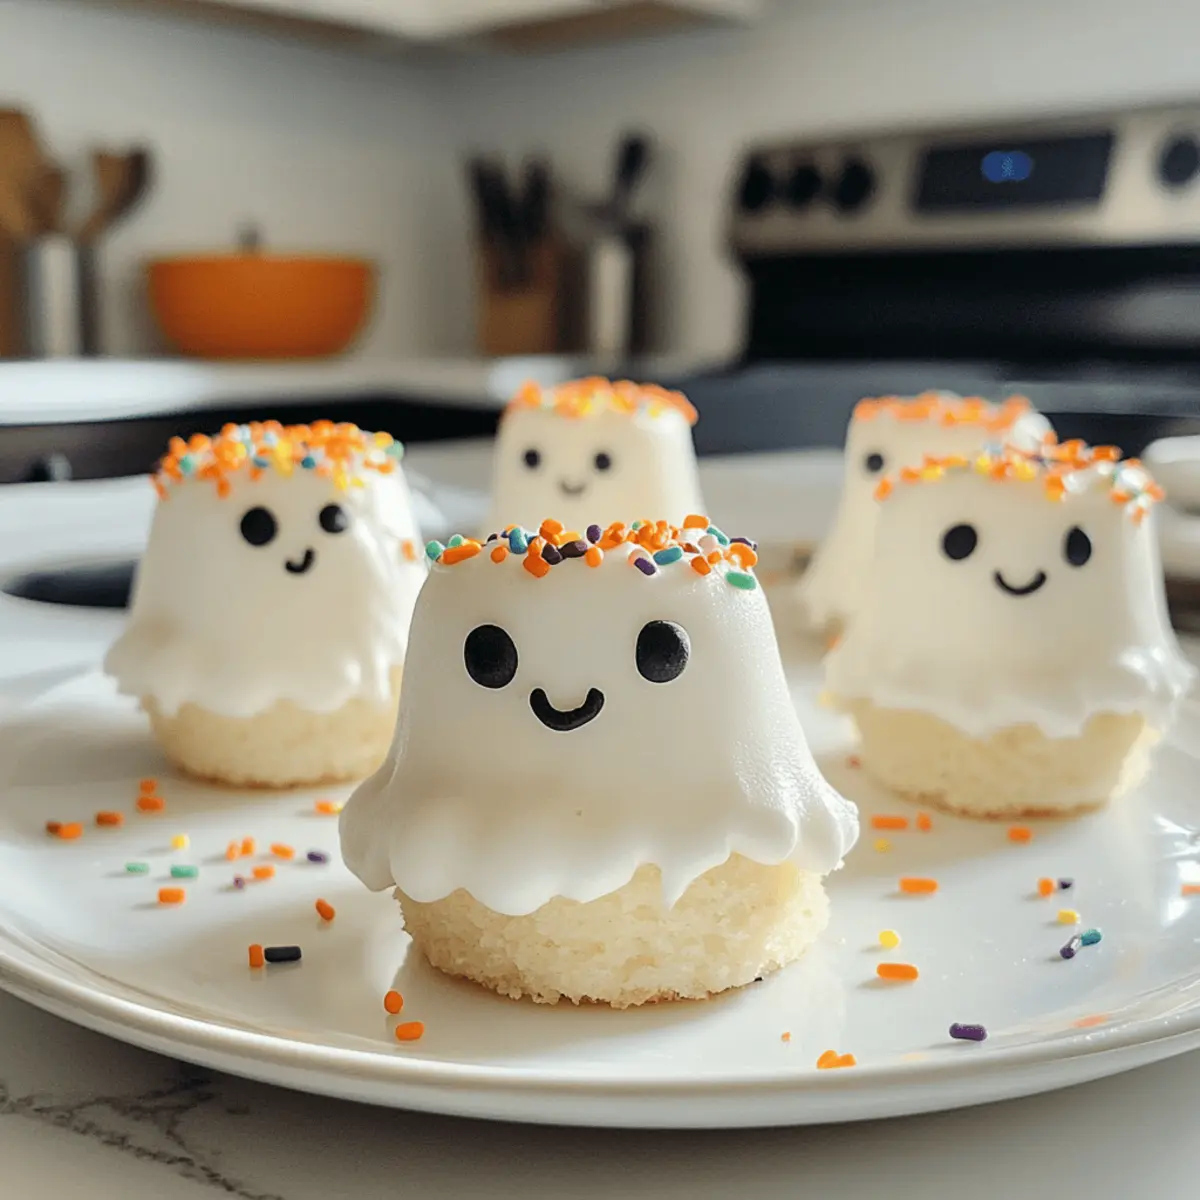
Now it’s time to bring your spooky cute ghost mini cake pans to life! Use a spatula or piping bag to frost each cooled cake with the fluffy buttercream, creating whimsical, ghostly shapes. Get creative by adding sprinkles or edible eyes to complete the festive look. These delightful treats will surely be the highlight of any Halloween gathering!
What to Serve with Spooky Cute Ghost Mini Cake Pans?
As you prepare to spread some Halloween cheer, consider these delightful pairings that will add even more fun to your festive gathering!
-
Creamy Pumpkin Soup: This warm, savory soup complements the sweetness of the cakes, creating a balanced meal perfect for fall festivities. The richness of the pumpkin will also echo those warm autumn flavors.
-
Crispy Sweet Potato Fries: Their slight sweetness and crunch contrast beautifully with the soft ghost cakes. Plus, these vibrant fries add a pop of color to your Halloween spread!
-
Witch’s Brew Punch: A refreshing, fruity punch will not only hydrate but also create a whimsical drink experience. Use grape juice and soda for a fizzy, spooky treat that appeals to kids and adults alike.
-
Spooky Fruit Platter: An assortment of ghost-shaped melon balls and orange segments can serve as a healthy snack. The bright colors will visually enhance your table, providing a freshness that balances out dessert.
-
Chocolate Dipped Marshmallows: These sweet treats echo the dessert theme while offering an interactive element. Let guests prepare their own, choosing from sprinkles and crushed candy for a fun touch!
-
Candied Apple Bites: These mini treats are a festive nod to Halloween tradition, with a crisp exterior and a touch of sweetness that pairs nicely with your ghostly cakes. They’ll be a hit for both adults and children!
Whatever you pair with your Spooky Cute Ghost Mini Cake Pans, each suggestion brings warmth and flavor to your celebrations, making your Halloween gathering a delightful treat!
Ghost Mini Cake Pans Variations
Feel free to make these charming ghost mini cakes your own with creative twists and substitutions!
-
Vanilla Swap: Use a vanilla box cake mix instead of chocolate for a lighter flavor that still delights!
-
Red Velvet Surprise: Switch to a red velvet cake mix for a festive twist that adds a pop of color. Perfect for Halloween celebrations!
-
Vegan Charm: Replace eggs with 1/4 cup of unsweetened applesauce per egg and use margarine for a delicious vegan treat. Everyone will love them!
-
Alternative Milks: Swap buttermilk with almond milk mixed with a splash of vinegar for a dairy-free option without compromising taste.
-
Flavor Boost: Add a teaspoon of almond extract in the cake batter for an unexpected and delightful flavor kick.
-
Different Colors: Use pastes or gels to tint your buttercream in various spooky colors. Imagine green ghosts or orange pumpkins!
-
Spicy Option: Mix in a dash of cinnamon or nutmeg into your batter for an autumnal flavor that envelops your taste buds warmly.
-
Mini Fruit Pizzas: For a fresh twist, decorate with slices of seasonal fruits on top of a layer of buttercream, creating a blend of flavors that feels festive and bright. You can even check out my recipe for Mini Fruit Pizzas for fresh inspiration!
How to Store and Freeze Ghost Mini Cake Pans
Room Temperature: Store undecorated ghost mini cakes in a cool, dry place for up to 2 days. Be sure to cover them with a clean kitchen towel to keep them fresh.
Fridge: If decorated, place ghost mini cakes in an airtight container and refrigerate for up to 3 days. This helps to preserve the fluffy buttercream while preventing it from drying out.
Freezer: For long-term storage, freeze undecorated ghost mini cakes wrapped tightly in plastic wrap and then aluminum foil for up to 1 month. Thaw in the fridge before decorating.
Reheating: If you wish to enjoy a slice at room temperature, take the mini cakes out of the fridge or freezer and let them sit for at least 30 minutes before serving to restore their delightful texture.
Make Ahead Options
These Spooky Cute Ghost Mini Cake Pans are perfect for busy home cooks looking to save time without sacrificing flavor! You can prep the cake batter up to 24 hours in advance; simply mix the ingredients and store the batter in the refrigerator in an airtight container. To maintain quality, avoid letting the batter sit too long, which may affect the texture. Additionally, you can bake the cakes, cool them, and then refrigerate them for up to 3 days before frosting. For the best results, decorate them just before serving to keep the buttercream fresh and fluffy. Enjoy having festive treats ready at a moment’s notice!
Expert Tips for Ghost Mini Cake Pans
-
Room Temperature Butter: Ensure your butter is at room temperature, not melted, for a smooth buttercream that’s easy to spread.
-
Oven Watch: Keep an eye on your ghost mini cakes while baking; oven temperatures vary and can affect baking times. Adjust as necessary.
-
Cool Before Frosting: Allow your cakes to cool completely before frosting to prevent crumbling and ensure a neat application of buttercream.
-
Creative Decoration: Have fun with your decorating! Use different themed sprinkles or edible glitter to personalize your ghost mini cakes.
-
Mixing Speed: When preparing your buttercream, start mixing at low speed to avoid a powdered sugar cloud and then increase for a fluffy finish.
Spooky Cute Ghost Mini Cake Pans Recipe FAQs
How do I choose the right cake mix for my ghost mini cakes?
Absolutely! A chocolate box cake mix is the base flavor for these ghost mini cakes, but you can certainly switch it up with a vanilla or even a red velvet cake mix for a unique twist. If you’re feeling adventurous, experiment with gluten-free mixes to cater to dietary preferences!
What is the best way to store leftover ghost mini cakes?
Very! If you have leftover decorated ghost mini cakes, simply place them in an airtight container and refrigerate them for up to 3 days. If they’re undecorated, store them at room temperature, covered with a clean kitchen towel, for about 2 days to keep them fresh and delicious!
Can I freeze my ghost mini cakes?
Absolutely! To freeze undecorated ghost mini cakes, wrap each one tightly in plastic wrap, followed by aluminum foil, to prevent freezer burn. They can be stored in the freezer for up to 1 month. When you’re ready to enjoy them, just thaw in the fridge overnight before decorating!
What if my buttercream frosting isn’t fluffy enough?
Very! If your buttercream doesn’t turn out fluffy, it may be due to not mixing it long enough. After adding the softened butter, make sure to mix at medium speed for at least 10 minutes, scraping down the bowl occasionally. This will incorporate air into the frosting, giving it that light and airy texture.
Are there any dietary restrictions I should consider with this recipe?
Absolutely! If you’re baking for someone with egg allergies or following a vegan diet, you can substitute the eggs with 1/4 cup of unsweetened applesauce per egg. For the buttercream, use aquafaba in place of pasteurized egg whites. This way, everyone can enjoy the spooky cute ghost mini cakes!
Can I decorate my ghost mini cakes in advance?
Very! You can frost the mini cakes a day ahead of time. Just make sure to store them in an airtight container in the refrigerator. However, I often recommend decorating them closer to serving time for the best texture and appearance, but they’ll still taste delicious if prepared ahead!
Spook Up Your Halloween with Ghost Mini Cake Pans
Ingredients
Equipment
Method
- Preheat your oven to 325°F (163°C) and grease the mini cake pans.
- In a mixing bowl, combine the chocolate cake mix, buttermilk, vegetable oil, eggs, and vanilla extract. Mix for 2 minutes until smooth.
- Pour the batter into the prepared pans, filling each just under halfway.
- Bake for 25 to 30 minutes or until a toothpick comes out clean.
- Let the cakes cool in the pans for 15 minutes before inverting onto a wire rack.
- In a bowl, combine egg whites, powdered sugar, and salt. Beat on low speed, then high until stiff peaks form.
- Gradually add softened butter and mix for about 10 minutes until creamy.
- Add additional vanilla and mix on low to medium speed for another 5-10 minutes.
- Frost the cooled cakes with the buttercream using a spatula or piping bag.
- Decorate with sprinkles or edible eyes as desired.