There’s something magical about discovering a new treat that feels both nostalgic and fresh. Milk Mochi is one of those delightful finds. This Japanese dessert, with its chewy texture and sweet flavor, is perfect for anyone looking to impress friends or simply indulge in a little self-care.
Whether you’re a busy dad needing a quick dessert solution or a home cook wanting to try something new, this recipe is a breeze. With just a few ingredients and minimal time, you can whip up a batch of Milk Mochi that will have everyone asking for seconds!
Why You’ll Love This Milk Mochi
Milk Mochi is a game-changer in the dessert world. It’s incredibly easy to make, requiring just a few simple ingredients and minimal effort. In under 15 minutes, you can create a sweet treat that’s chewy, satisfying, and downright delicious. Plus, it’s versatile! You can customize it with flavors or toppings, making it perfect for any occasion. Trust me, once you try it, you’ll be hooked!
Ingredients for Milk Mochi
Gathering the right ingredients is the first step to creating your delicious Milk Mochi. Here’s what you’ll need:
Sweet rice flour (mochi flour): This is the star of the show! It gives Milk Mochi its signature chewy texture. You can find it in Asian grocery stores or online.
Milk: Whole milk works best for a rich flavor, but feel free to use any milk you prefer, including almond or oat milk for a dairy-free option.
Sugar: This sweetens the mochi and balances the flavors. You can substitute with honey or agave syrup if you want a different sweetness profile.
Vanilla extract: A splash of this adds a lovely aroma and depth to the flavor. You can also experiment with almond extract for a unique twist.
Cornstarch: This is used for dusting to prevent the mochi from sticking. It’s essential for handling the dough easily.
Water: Just a little helps to combine the ingredients smoothly, ensuring a perfect consistency.
For those looking to get creative, consider these optional ingredients:
Cocoa powder: Add a couple of tablespoons for a chocolatey version that’s sure to please any sweet tooth.
Pureed fruit: Incorporate half a cup of your favorite fruit puree, like strawberry or mango, for a fruity twist that brightens up the mochi.
Exact measurements for these ingredients can be found at the bottom of the article, ready for you to print and take to the kitchen!
How to Make Milk Mochi
Making Milk Mochi is a straightforward process that anyone can master. Follow these simple steps, and you’ll be enjoying this delightful Japanese treat in no time!
Step 1: Combine Ingredients
Start by grabbing a large mixing bowl. Add the sweet rice flour, milk, sugar, and vanilla extract. Whisk everything together until the mixture is smooth and free of lumps. This is where the magic begins, so make sure to mix well!
Step 2: Microwave the Mixture
Next, transfer your smooth mixture into a microwave-safe bowl. Cover it loosely with a lid or plastic wrap, leaving a small gap for steam to escape. Microwave on high for 1 minute. After that, take it out and stir well. Return it to the microwave for another minute, then stir again. Finally, microwave for an additional 30 seconds. The mixture should be thick and slightly sticky, perfect for mochi!
Step 3: Prepare the Surface
While the mochi mixture cools, dust a clean surface with cornstarch. This will prevent the mochi from sticking when you pour it out. A generous dusting is key here, so don’t be shy!
Step 4: Knead the Dough
Once the mixture has cooled for about 10 minutes, it’s time to get your hands a little messy. Dust your hands with cornstarch to avoid sticking, then gently knead the mochi dough for about a minute. This step helps develop that chewy texture we all love.
Step 5: Shape the Mochi
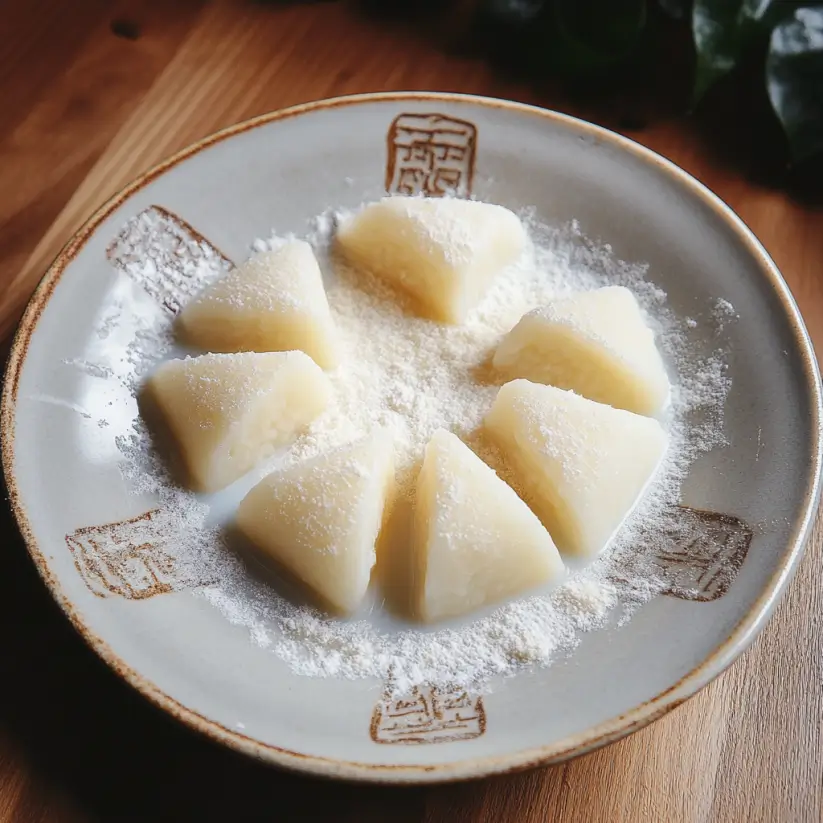
Now, divide the dough into small pieces, about 1 inch each. You can roll them into balls or flatten them into discs, depending on your preference. The fun part is getting creative with the shapes!
Step 6: Dust and Serve
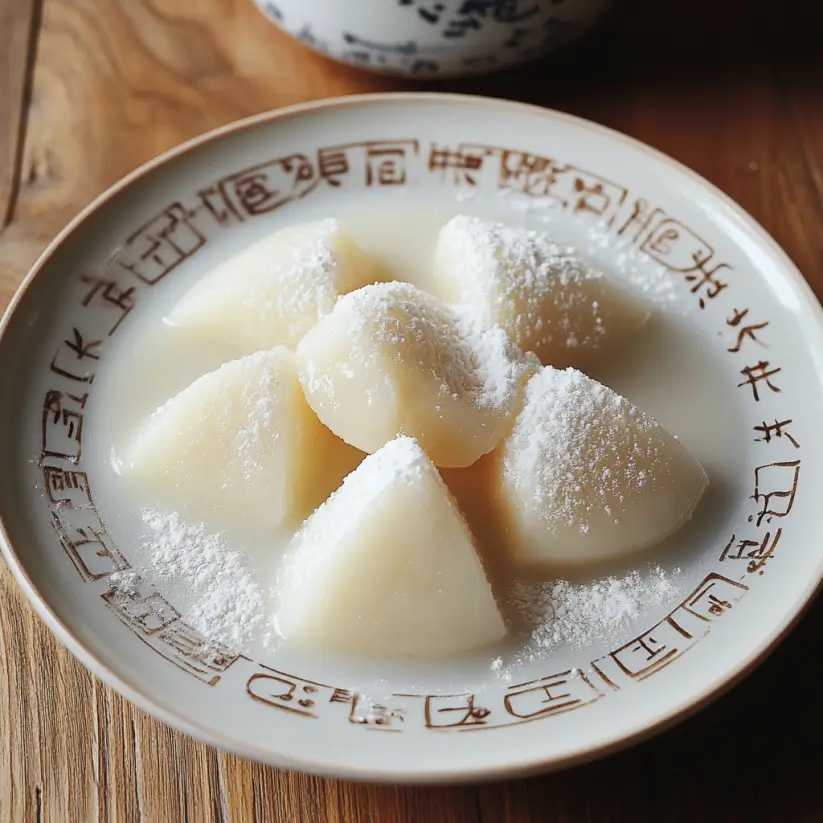
Finally, dust your finished mochi pieces with more cornstarch to keep them from sticking together. Serve them immediately for the best texture, or store them in an airtight container in the fridge for up to 3 days. Enjoy your homemade Milk Mochi!
Tips for Success
Use a microwave-safe bowl that’s large enough to allow the mixture to expand while cooking.
Don’t skip the cornstarch dusting; it’s crucial for handling the mochi without it sticking to your hands.
Experiment with flavors! Adding a bit of cocoa or fruit puree can elevate your Milk Mochi.
Let the mochi cool completely before shaping for easier handling.
Store any leftovers in an airtight container to keep them fresh and chewy.
Equipment Needed
Mixing bowl: A large bowl for combining ingredients. Any bowl will do, but glass or stainless steel works best.
Whisk: Essential for mixing. A fork can work in a pinch if you don’t have one.
Microwave-safe bowl: For cooking the mochi mixture. Make sure it’s deep enough to prevent spills.
Plastic wrap or lid: To cover the bowl while microwaving. A plate can also serve this purpose.
Dusting surface: A clean countertop or cutting board for shaping the mochi.
Variations of Milk Mochi
Chocolate Milk Mochi: Add 2 tablespoons of cocoa powder to the mixture before microwaving for a rich, chocolatey treat that’s sure to satisfy any sweet tooth.
Fruit-Infused Mochi: Mix in 1/2 cup of pureed fruit like strawberry, mango, or even matcha for a refreshing twist that adds a burst of flavor.
Nutty Delight: Incorporate a tablespoon of finely chopped nuts, such as almonds or walnuts, into the dough for added texture and flavor.
Matcha Mochi: For a unique flavor, add 1-2 teaspoons of matcha powder to the mixture. This not only gives a beautiful green color but also a delightful earthy taste.
Vegan Option: Substitute regular milk with almond, soy, or oat milk to make a delicious vegan version of Milk Mochi.
Serving Suggestions for Milk Mochi
Pair your Milk Mochi with a cup of green tea for a traditional Japanese experience.
Serve with fresh fruit slices, like strawberries or mangoes, for a refreshing contrast.
Drizzle with chocolate or caramel sauce for an indulgent touch.
Present on a decorative plate, dusted with extra cornstarch for a beautiful finish.
Enjoy as a sweet snack or dessert after a hearty meal!
FAQs about Milk Mochi
Curious about Milk Mochi? You’re not alone! Here are some common questions I’ve encountered, along with answers to help you navigate this delightful treat.
What is Milk Mochi made of?
Milk Mochi is primarily made from sweet rice flour, milk, sugar, and vanilla extract. These ingredients come together to create a chewy, sweet dessert that’s both satisfying and easy to make.
Can I make Milk Mochi without a microwave?
Absolutely! If you prefer not to use a microwave, you can steam the mixture instead. Just pour it into a heatproof dish and steam for about 20-30 minutes until thickened.
How should I store leftover Milk Mochi?
Store any leftover Milk Mochi in an airtight container in the refrigerator. It will stay fresh for up to three days. Just remember to dust it with cornstarch to prevent sticking!
Can I customize the flavors of Milk Mochi?
Definitely! You can add cocoa powder for a chocolate version or mix in fruit purees for a fruity twist. The possibilities are endless, so feel free to get creative!
Is Milk Mochi gluten-free?
Yes! Since Milk Mochi is made with sweet rice flour, it is naturally gluten-free. Just ensure that all your ingredients are certified gluten-free if you have dietary restrictions.
Final Thoughts
Creating Milk Mochi is more than just whipping up a dessert; it’s about embracing a little piece of Japanese culture in your kitchen. The chewy texture and sweet flavor bring joy to every bite, making it a perfect treat for family gatherings or a quiet evening at home.
I love how this recipe invites creativity, allowing you to experiment with flavors and shapes. Whether you’re sharing it with loved ones or savoring it solo, Milk Mochi is sure to become a cherished addition to your dessert repertoire. So, roll up your sleeves and enjoy the delightful journey of making this sweet treat!
Milk Mochi is a delightful and easy-to-make Japanese treat made from sweet rice flour, milk, and sugar, resulting in a chewy and sweet dessert.
Ingredients
Scale
2 cups sweet rice flour (mochi flour)
1 cup milk
1 cup sugar
1 teaspoon vanilla extract
1 tablespoon cornstarch (for dusting)
1/4 cup water
Instructions
In a large mixing bowl, combine the sweet rice flour, milk, sugar, and vanilla extract. Whisk until smooth and there are no lumps.
Transfer the mixture to a microwave-safe bowl. Cover it loosely with a microwave-safe lid or plastic wrap, leaving a small gap for steam to escape.
Microwave on high for 1 minute. Remove and stir well. Return to the microwave and cook for another minute. Stir again, then microwave for an additional 30 seconds. The mixture should be thick and slightly sticky.
Dust a clean surface with cornstarch. Pour the mochi mixture onto the surface and let it cool for about 10 minutes.
Once cool enough to handle, dust your hands with cornstarch and knead the mochi gently for a minute. Divide the dough into small pieces (about 1 inch each) and shape them into balls or flatten them into discs.
Dust the finished mochi pieces with more cornstarch to prevent sticking.
Serve immediately or store in an airtight container in the refrigerator for up to 3 days.
Notes
For a chocolate version, add 2 tablespoons of cocoa powder to the mixture before microwaving.
For a fruity twist, incorporate 1/2 cup of pureed fruit (like strawberry or mango) into the batter.