

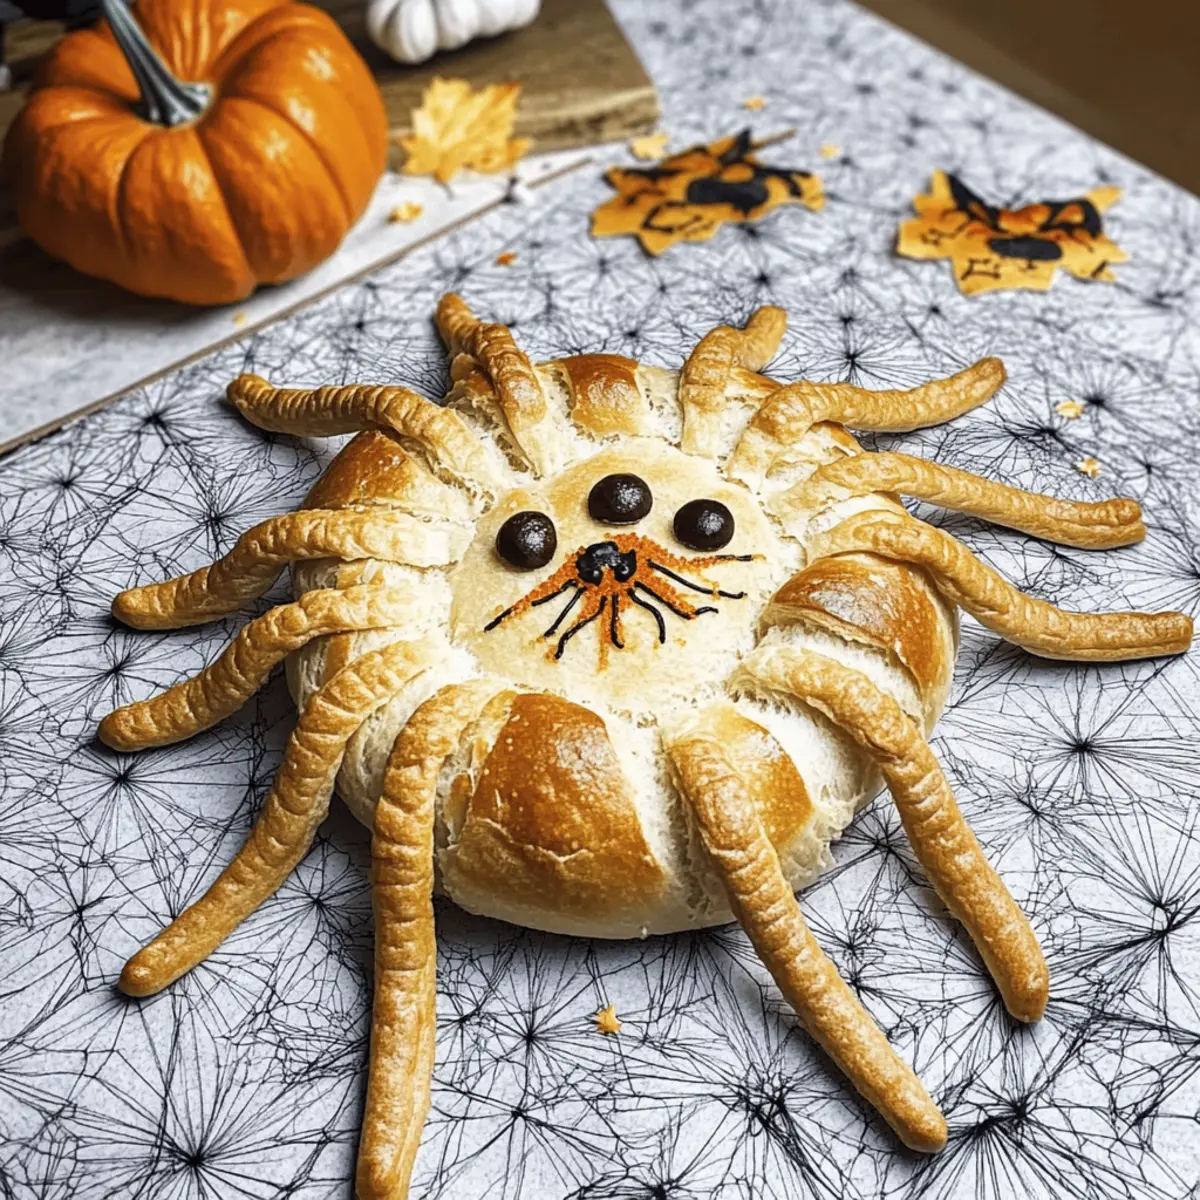
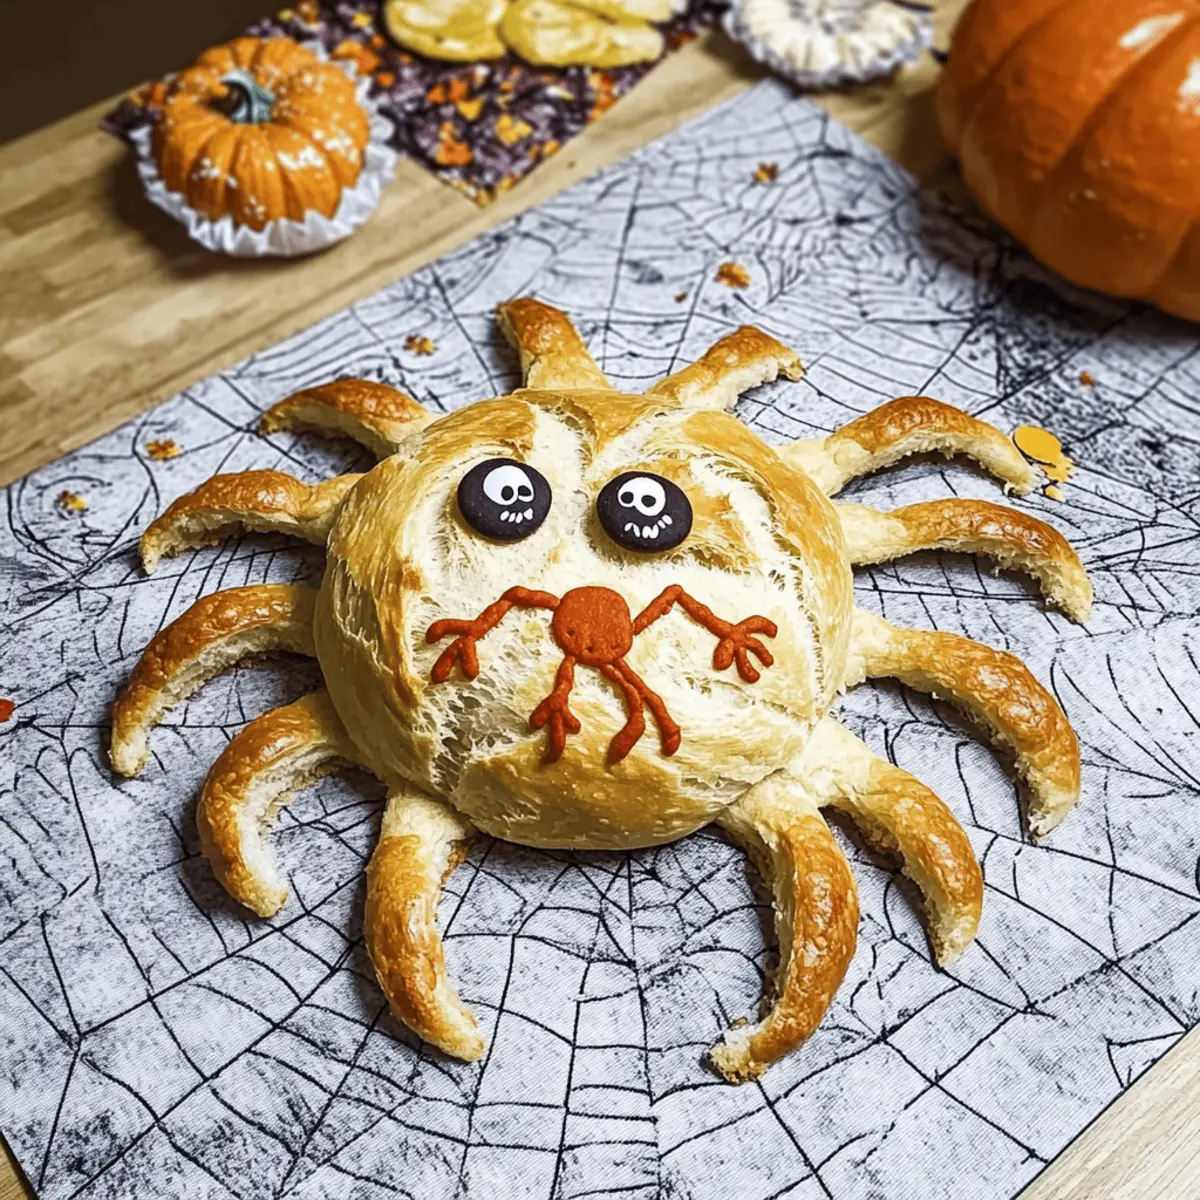
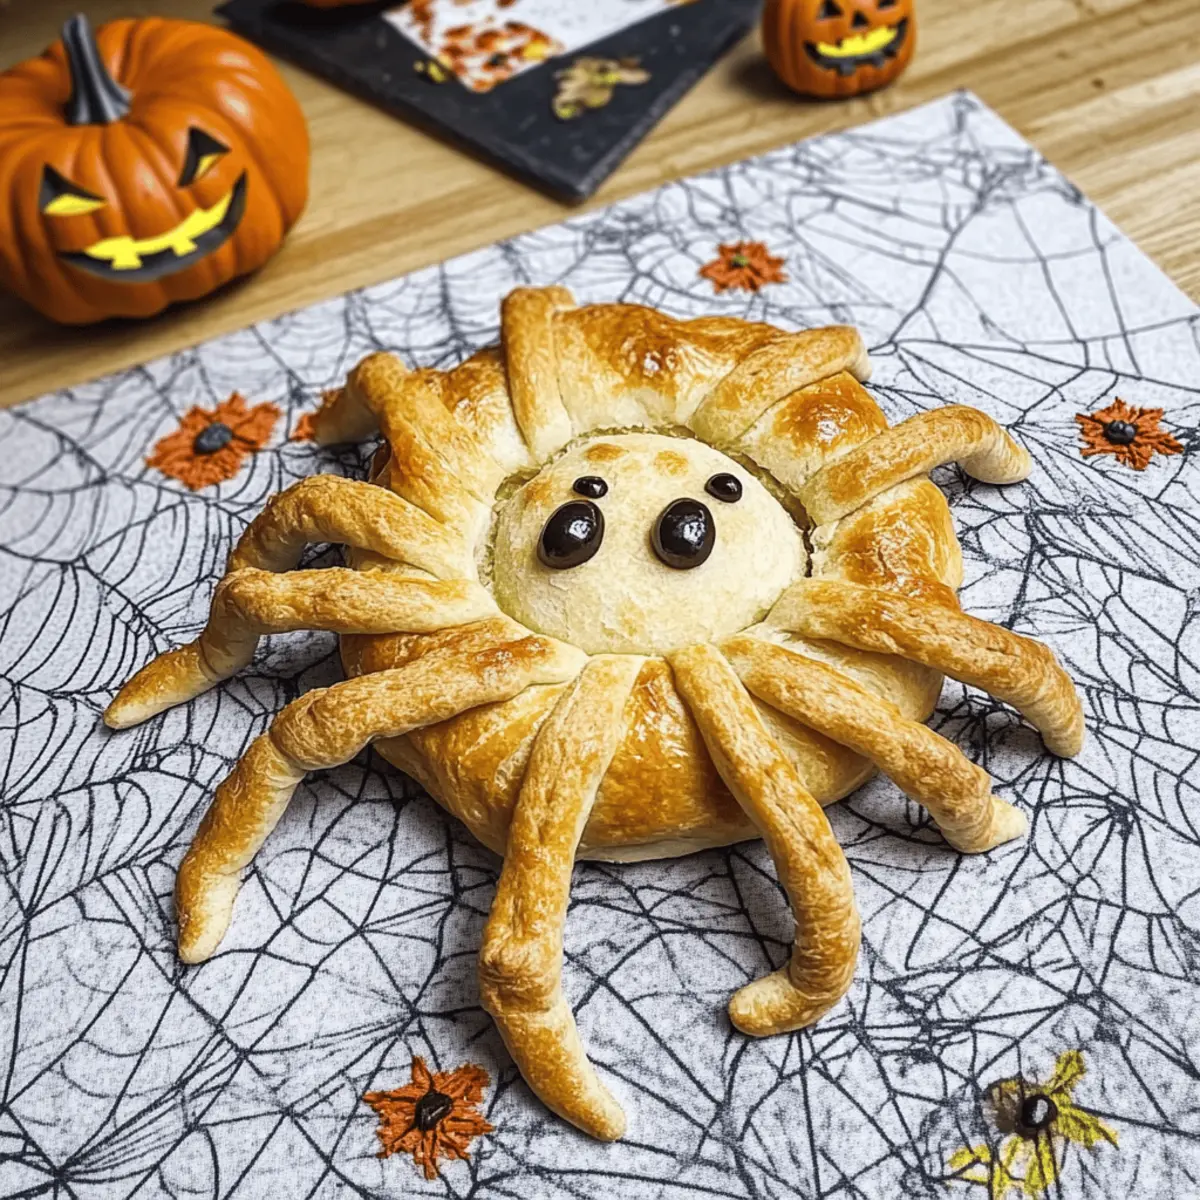
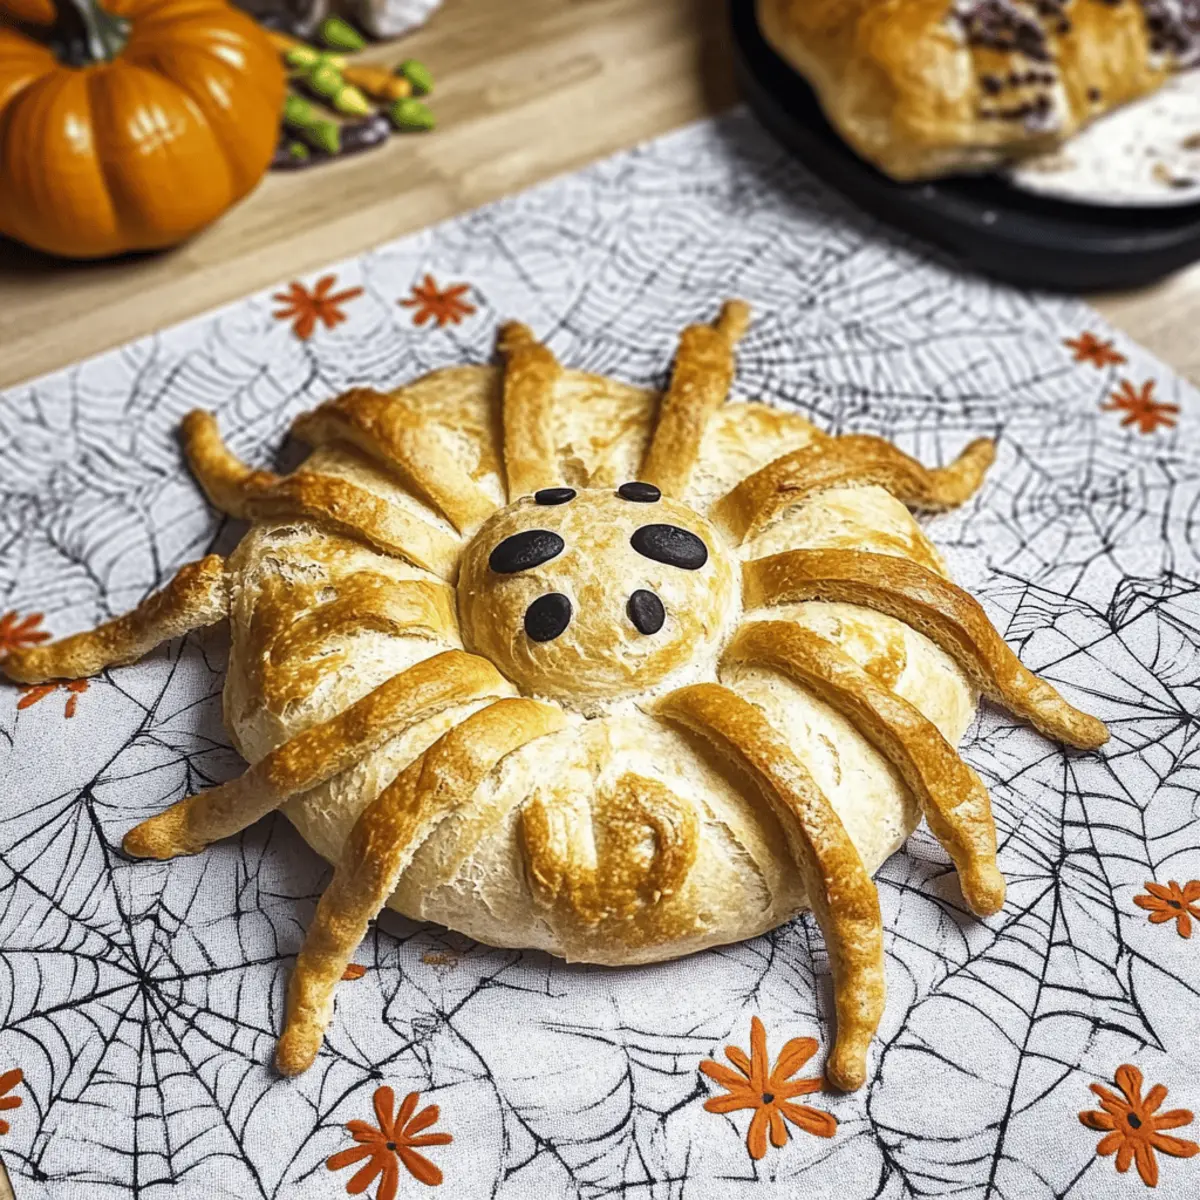
As the leaves turn and nights grow crisp, my kitchen transforms into a bustling hub of Halloween creativity. This year, I’ve whipped up something truly playful: a Halloween Spider Bread Bowl! This delightful dish combines the fun of bread-making with the joy of festive gatherings. Not only is it easy to whip up, but it also doubles as a fantastic centerpiece for your party table—perfect for showcasing your favorite dips. Each fluffy bite, shaped like a cheeky spider with soft, bready legs, makes it irresistible to guests of all ages. Plus, it’s a great way to ditch the takeout and bring some homemade charm to your spooky celebrations. Curious how to summon this spooktacular treat in your own kitchen? Let’s dive into the recipe!
Why is Spider Bread Bowl a must-try?
Creative and Fun: This Halloween Spider Bread Bowl adds whimsy to your festive table, instantly charming guests and kids alike.
Easy to Make: Even novice bakers can tackle this recipe without breaking a sweat—just mix, shape, and bake!
Versatile Filling: You can fill it with your favorite dip, from creamy spinach to zesty salsa, making it a guaranteed crowd-pleaser. Try it with bite-sized veggies or chips for extra fun!
Perfect Presentation: Serve your Spider Bread Bowl as a standout centerpiece—it’s not just food; it’s a conversation starter!
Leftover Love: If you have any leftovers (not likely!), they can be easily reheated for round two! Alternatively, try a delightful sweet variation like pumpkin pie filling for dessert.
Halloween Spider Bread Ingredients
• Note: Here’s everything you’ll need to create your Halloween Spider Bread—get ready for some fun in the kitchen!
For the Dough
- Bread Flour – Provides structure and chewiness to the bread; use all-purpose flour for a softer bowl.
- Water – Hydrates the dough, activating the yeast and ensuring proper gluten development.
- Yeast – Leavens the dough, allowing it to rise; instant yeast can be used for quicker results.
- Salt – Enhances flavor and strengthens gluten structure; don’t skip it for the best taste!
- Sugar – Feeds yeast and adds a hint of sweetness; feel free to swap with honey or agave syrup if needed.
- Oil (olive or vegetable) – Keeps the bread moist and contributes to its tenderness.
For the Eyes
- Coffee Beans/Peppercorns – Used for the eyes of the spiders; olives or chocolate chips could work for a sweet twist!
Now you’re ready to create your spooktacular Halloween Spider Bread!
Step‑by‑Step Instructions for Halloween Spider Bread
Step 1: Dough Preparation
In a large mixing bowl, combine 4 cups of bread flour, 2 teaspoons of instant yeast, 1 ½ teaspoons of salt, and 2 tablespoons of sugar. Gradually add in 1 ½ cups of warm water while stirring with a wooden spoon until a shaggy dough forms. Once combined, knead the dough on a floured surface for about 8-10 minutes until it becomes smooth and elastic.
Step 2: Shaping the Spider
After kneading, divide the dough into two portions: one larger piece for the body and one smaller piece for the head. Shape the larger portion into an oval for the body and the smaller into a round ball for the head. For the legs, cut off additional smaller pieces and roll each into long ropes that are approximately 12 inches in length; you’ll need four for each spider.
Step 3: Proofing the Dough
Place the shaped spider body and head on a parchment-lined baking sheet. Arrange the rolled legs around the body, ensuring they’re curved to resemble spider legs. Cover the entire tray with a clean kitchen towel and let the dough rise in a warm area for 30 to 45 minutes, or until visibly puffed and slightly expanded.
Step 4: Preheat the Oven
While the spider bread rises, preheat your oven to 400°F (200°C). This ensures that the oven is hot enough to create a perfect crust for your Halloween Spider Bread. Make sure to preheat for at least 15 minutes to achieve that golden-brown finish while baking.
Step 5: Assembling the Spiders
Once the dough has risen, gently attach the legs to the body by pressing them onto the sides. Next, place coffee beans or peppercorns as the spider’s eyes on the head. For added charm, you can make tiny indentations to secure the eyes better, ensuring a fun and playful design for your Halloween Spider Bread.
Step 6: Baking the Spider Bread
Before baking, brush the surface of the dough with an egg wash (1 beaten egg mixed with a splash of water) to promote browning. Bake the larger spider for 20 to 25 minutes, and the smaller “baby” spiders for 15 to 20 minutes, until they turn a deep golden brown, and the bread sounds hollow when tapped on the bottom.
Step 7: Cooling the Bread
Once baked, remove the Halloween Spider Bread from the oven and let it cool on a wire rack for about 20 minutes. This step is essential to develop the texture and flavor. Handle gently to avoid breaking the delicate legs, and be sure to let it cool completely before serving to guests.
What to Serve with Spooktacular Halloween Spider Bread Bowl
As you gather around for a hauntingly delightful meal, consider these tasty accompaniments that will elevate your Halloween feast.
-
Creamy Spinach Dip: Its rich, smooth texture complements the warm, fluffy spider bread while adding a pop of color that’s perfect for Halloween.
-
Spicy Salsa: This zesty dip offers a refreshing contrast to the savory bread, invigorating your palate with each bite. Pair it with crunchy tortilla chips for extra fun.
-
Cheesy Beer Dip: Indulge in a gooey, cheesy dip that oozes comfort. The flavors intertwine beautifully with the homemade bread, satisfying both kids and adults alike.
-
Chilled Veggie Platter: Crisp carrots, bell peppers, and celery sticks add a fresh crunch beside the warm bread; it’s a vibrant, healthful counterpoint that balances richness.
-
Garlic Butter Wings: Serve up crispy chicken wings brushed with garlic butter. They’re easy to eat and pair perfectly with the spider bread for a hearty treat.
-
Apple Cider: A glass of warm apple cider brings a festive feel to the table. Its sweet, spiced notes harmonize beautifully with your Halloween spread.
-
Pumpkin Pie Bites: For a sweet twist, these mini treats echo the holiday’s flavors and can balance the savory dips beautifully. Serve them alongside your spider bread for a playful dessert option!
Expert Tips for Halloween Spider Bread
-
Precision Counts: Use a kitchen scale for accurate ingredient measurements to ensure your Halloween Spider Bread turns out perfectly each time.
-
Gentle Handling: Be careful when transferring the shaped dough; the delicate legs can break easily if not handled gently.
-
Freshness Matters: This bread is best served fresh from the oven, but if making ahead, spritz with a little water and reheat to refresh its fluffy texture.
-
Egg Wash Importance: Brushing with an egg wash before baking not only adds a lovely golden color but also enhances the overall presentation of your spooky creation.
-
Make it Your Own: Feel free to incorporate herbs or spices into the dough for exciting flavor variations, making your Halloween Spider Bread uniquely yours!
Make Ahead Options
These Halloween Spider Bread Bowls are perfect for busy bakers looking to save time during the festivities! You can prepare the dough up to 24 hours in advance; simply mix it and shape it into the spider form, then cover and refrigerate. When you’re ready to bake, allow the shaped bread to come to room temperature (about 30 minutes) and let it rise again until puffed. For optimal quality, bake and cool the bread, then wrap it tightly in plastic wrap and store at room temperature for up to 3 days. To rejuvenate the bread before serving, warm it in the oven for a few minutes, and enjoy this spooktacular treat that remains just as delightful as fresh!
Halloween Spider Bread Variations
Feel free to unleash your creativity and make this recipe reflect your personal taste! Your kitchen will come alive with delightful variations.
-
Herb-Infused: Add dried herbs like rosemary or thyme directly into the dough for a fragrant twist. The extra aroma pairs beautifully with any savory dip!
-
Cheesy Goodness: Mix in shredded cheese like cheddar or mozzarella in the dough for a deliciously cheesy bread bowl. It elevates the flavors and makes every bite even more irresistible.
-
Sweet Treat: Swap the savory filling for something sweet—try using pumpkin pie filling or chocolate spread. The cute spider shape suddenly turns into a delightful dessert!
-
Whole Wheat Option: For a healthier alternative, replace half the bread flour with whole wheat flour. It adds a nutty flavor and increases the fiber content.
-
Spice it Up: Incorporate spices like garlic powder or paprika into the dough for an exciting flavor boost. It can add a touch of warmth that complements your dipping sauce perfectly.
-
Mini Versions: Create fun-sized “baby” spider bread bowls for a cute presentation at gatherings. They can hold individual servings of your favorite dips, making sharing a breeze!
-
Olive Eyes: For a savory spin on the spider’s appearance, replace coffee beans with black olives for the eyes of your spiders. This swap gives a more traditional touch to your spooky creation!
-
Multi-Dip Delight: Make several smaller spider bread bowls and stuff them with different dips, such as spinach dip, cheese dip, or even a creamy seafood filling. Guests will love the variety when they gather around!
Don’t forget to pair your Halloween Spider Bread with some delicious dips like Creamy Seafood Bread Bowl or fun sides like Southern Style Honey Butter Cornbread. Enjoy the spooky season with these fun variations!
How to Store and Freeze Halloween Spider Bread
Room Temperature: Keep your Halloween Spider Bread covered with a clean kitchen towel or in a bread box for up to 1 day to maintain freshness.
Fridge: For longer storage, wrap the bread in plastic wrap and place it in the fridge for up to 3 days. This helps prevent it from drying out.
Freezer: To freeze, wrap the bread tightly in plastic wrap and then in aluminum foil. It can be stored in the freezer for up to 3 months; simply thaw at room temperature.
Reheating: To enjoy leftovers, reheat the bread in a preheated oven at 350°F for about 10 minutes. Spritz with a little water before baking to revive its soft texture.
Halloween Spider Bread Recipe FAQs
How can I tell if my bread flour is fresh enough?
Check the expiration date on the package; fresher flour results in better gluten development. Additionally, you can give it a quick sniff! Fresh bread flour should have a light, pleasant scent. If it smells off or has a bitter aroma, it’s best to get a new bag.
What’s the best way to store my Halloween Spider Bread?
For optimal freshness, store your bread at room temperature, lightly covered with a kitchen towel or in a bread box for up to 1 day. If you have leftovers beyond that, you can wrap it in plastic wrap and refrigerate it for up to 3 days, ensuring it doesn’t dry out.
Can I freeze the Halloween Spider Bread?
Absolutely! To freeze, wrap the bread tightly in plastic wrap followed by aluminum foil. This double wrapping prevents freezer burn and allows you to enjoy your spooky creation for up to 3 months! Thaw at room temperature when you’re ready to serve.
What should I do if my dough isn’t rising?
If your dough isn’t rising as expected, check the freshness of your yeast; it should be active. Warm water is also crucial; if it’s too hot, the yeast could die, and if it’s too cold, it won’t activate properly. Aim for warm water, about 110°F (43°C), which helps yeast bloom perfectly!
Is this recipe suitable for kids or those with allergies?
Yes! The Halloween Spider Bread recipe is versatile, but be mindful of any dietary restrictions. For children, always supervise during the mixing and kneading. You can also swap out ingredients—like using gluten-free flour or ensuring any fillers (like dips) are allergy-friendly. Always check labels for cross-contamination!
How can I add a little twist to the flavor?
For a fun twist, mix in fresh herbs or dried spices like garlic powder or rosemary into the dough for an herbed flavor profile. Alternatively, consider using a sweet filling like pumpkin pie mix or chocolate chips for a dessert version! Just be creative—there are so many delicious paths you can take!
Delicious Halloween Spider Bread for a Spooky Gathering
Ingredients
Equipment
Method
- In a large mixing bowl, combine bread flour, yeast, salt, and sugar. Gradually add warm water while stirring until a shaggy dough forms.
- Knead the dough on a floured surface for about 8-10 minutes until smooth and elastic.
- Divide dough into two portions; one for the body and one for the head. Shape accordingly.
- Place the shaped spider body and head on a parchment-lined baking sheet, arranging the rolled legs around the body.
- Cover with a kitchen towel and let rise for 30 to 45 minutes in a warm area until puffed.
- Preheat oven to 400°F (200°C) for at least 15 minutes.
- Attach the legs to the body and place coffee beans or peppercorns on the head as eyes.
- Brush the dough with an egg wash and bake for 20-25 minutes until golden.
- Let cool on a wire rack for about 20 minutes before serving.